Signature Request Feature
This applies to Content Central v7.5 Document Management System.

Interested in learning more about Document Signature Compliance with Document Management Software? Download our Whitepaper
HERE.
Signature Request Feature
This allows documents in Content Central to be sent out for Signatures.
These are the requirements for Signature Request Feature:
- Outgoing Email Server must be configured so that an email can be sent out for Signature Request.
- Content Central must be Outward Facing or such that Content Central URL can be accessed through Public Internet.
Signature Request Action Menu
Login as a User with SHARE permission.
Preview a document in Content Central.
From the Action Panel, click 'Signature'. The Signature Pop-up will appear.
In the Signature Request Pop-op Menu, enter or select items based on your preference.
Click 'Send'.
Signature Request Pop-up Menu
Pre-defined Signature Locations or Signature Types
Select from the 'Use Pre-defined Signature Locations':
None
When 'None' is selected, the recipient/signatory of the Signature Request will determine the Signature Location(s).
Document Type
When 'Document Type' is selected, a pre-configured or pre-defined Signature Definition/Template for the Document Type can be selected by any user. Optionally, an Admin User or member of the Administrator Group can create a new Signature Definitions or Templates for future selection; or, modify or delete an existing Signature Definition(s) or Template(s).
Document Type, User-defined
When 'Document Type, User-defined' is selected, a user-defined or user-configured Signature Definitions/Template can be selected by the user. Optionally, a user can create a new Signature Definition or Template; or, modify or delete an existing user-configured Signature Definition(s) or Template(s).
Signature Definition
Under Definition, select a Signature Definition or Template to use.
Optionally, click 'MODIFY'. A new tab will be launched for the Signature Page, to modify or preview the location of existing signature items of the selected Signature Definition or Template.
Optionally, click 'CREATE'. A new tab will be launched for the Signature Page, to create a new Signature Definition or Template.
Optionally, click 'DELETE' to delete the selected Signature Template.
Signatories
Under 'Add one or more signatories' or 'Assign all workflow signatories', enter Email Address(es) that will become recipients of the Signature Request.
Optionally, click 'USERS' to select a Content Central User, for sending the document to a Content Central User for signature.
Optionally, for 'TO...' enter an email address (recipient) to send the document to.
Signature Options
For 'Notify me when all signatures received' Option:
When CHECKED, the sender will be notified when all signatures are applied.
For 'Send signed document to recipients when signing is complete' Option:
When CHECKED, when all the Signatories have applied their signature, a notification with the Completely Signed Document attached will be sent to the all entered Signatories.
For 'Customize the signature request message' Option:
When CHECKED, the sender is allowed to enter Subject and Message Body for the Signature Request notification.
For 'Use Message Template' Option:
When CHECKED, pre-configured Signature Access Custom Message Template can be used.
Refer from Message Template KB Article.
Creating Signature Definition or Template
Login as Admin or User Member of the Administrator Group.
Preview a document in Content Central. This document becomes the basis of the Signature Definition or Template.
From the Action Panel, click 'Signature'. The Signature Pop-up will appear.
From the Signature Request Pop-up Menu, under 'Use Pre-defined Signature Locations', select 'Document Type' or 'Document Type, User-defined'.
Click 'CREATE'. A new tab will be launched. Optionally, click 'MODIFY' to modify existing Signature Definition or Template(s). A new tab will be launched for the Signature Page.
In the Signature Page or Tab, the document will preview and the Signature Template Tools.
Close the Welcome Page.
Click 'Add Signature' (green +) icon from the bottom right corner of the page. A floating Signature Item will appear. Multiple Signature Items can be created in the Page.
Existing Signature Items in the Signature Page can be reconfigured or repositioned or deleted.
Reconfigure or Delete ...

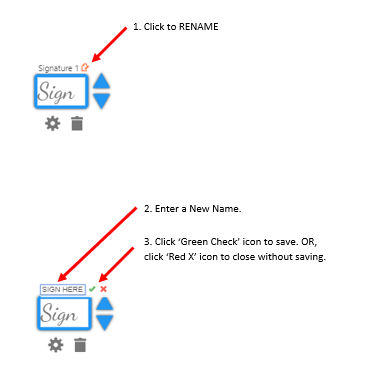
Signature Item Name
Click the 'Edit' icon to rename the Signature Item. Enter a New Name and save.
Signature Types, Style, Format and 'Depend on Field'
Click the Gear or Detail Icon to configure Signature Type.
Full. When Full is selected, specify the Style.
Initials. When Initials is selected, specify the Style.
Printed Name. When Printed Name is selected, specify the Style and 'Depends on Field' Signature Item. This Signature Item with this Type will automatically populate based on the 'Depends on Field' Signature when it is applied.
Date (Auto-Filled), When Date is selected, specify the Font, Format and 'Depends on Field' Signature Item. This Signature Item will automatically populate with the Date when the 'Depends on Field' Signature is applied.
Other. When Other is selected, specify the Font and 'Depends on Field' Signature Item. The Signatory/Recipient signing the 'Depends on Field' Signature will enter additional information on the 'Other' Signature Item at the time 'Depends on Field' Signature is applied.

'Depend on Field' Signature Item is the the 'Full' Type Signature Item that the Printed Name, Date and Other Signature Items can depends on.
Optionally, click on SETTINGS at the top-right of the Signature Page, when all Signature Items have been added and created. In the Settings Pop-up Menu, provide Name for the Signature Template and the Signature Workflow. Click SAVE to apply the settings.
The 'Signature Workflow' signifies the Signatories for the Full or Initial Signature Items and the order for which the document will be signed based on the Full or Initial Signature Items entered.
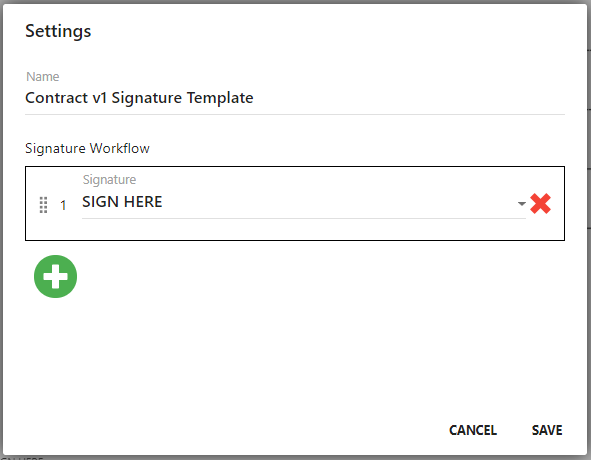
When Signature Template Name or Signature Workflow is NOT created created, a default Signature Template Name will be created.
Optionally, click 'Clear All' at the top-right of the Signature Page to remove all Signature Items in the page.
Click 'Submit' at the top-right of the Signature Page to save all signature items in the page and exit the page.
Pre-configured Signature Definition or Template can also be used for Approval Process for Approve and Sign Feature.
Content Central User Signature Options
A Content Central User can set up his or her own Signature Style in the User Options Page.
The Signature Style will apply automatically when a document is signed in the User's Signature Queue or in the Approval Queue when the Signature Template is linked to the Approval Process.
Interested in learning more about Document Signature Compliance with Document Management Software? Download our Whitepaper
HERE.
BY CHARLOTTE KING
Related Articles
Export Results Feature, CCv7
Export Results feature in Content Central v7.0 allows users to download a report based on all current documents showing in Content Central. The downloaded report is an XML File, that can be opened using Microsoft Excel as an XML table. While there is ...Add Entry Feature in the Folder Browser
The Add Entry Feature in Content Central allows users to add document files straight to the Catalog Folders. This applies to Content Central v7. Add Entry Feature Steps Click ‘Folder Browser’ in the Menu Panel. Click on a Catalog Folder. Navigate to ...CapturePoint Classify Rules or Document Layout Instructions
These instructions apply to CapturePoint v5.0.65 and above. Classify Rules or Document Layout Classify Rules or Document Layouts are used to automatically classify documents during the Capture Process. To create Classify Rules or Document Layouts - ...Bulk Import using Add docs to selected catalog
Bulk Import of electronic files can be done in Content Central using the "Add docs to selected catalog" feature from the Catalog Manager. STEPS: 1. Identify the Catalog Destination Folder. From the Content Central Server, launch Catalog Manager. ...SSL Certificate Update - GoDaddy
Importing a GoDaddy issued SSL certificate into IIS for secure connections Typically, a certificate authority will provide multiple file formats that contain the required information needed to add the certificate to different applications. IIS asks ...